
Felt Wall & Ceiling Panel, ceiling install
Peel-and-stick felt panels for walls, ceilings and simulator bays
The 4 × 6 ft felt panel, installed overhead with added anchors such as brad nails.
At a glance
- Layer
- Ceiling
- Category
- Panels
- Brand
- TruSim Systems
- Availability
- Coming soon
Specifications
- Size
- 4 × 6 ft (1219 × 1829 mm)
- Thickness
- 15 mm total
- Back
- Pressure-sensitive adhesive strips
- Ceiling anchors
- 18 ga brad nails, about 2 in, every 12 in along each joist
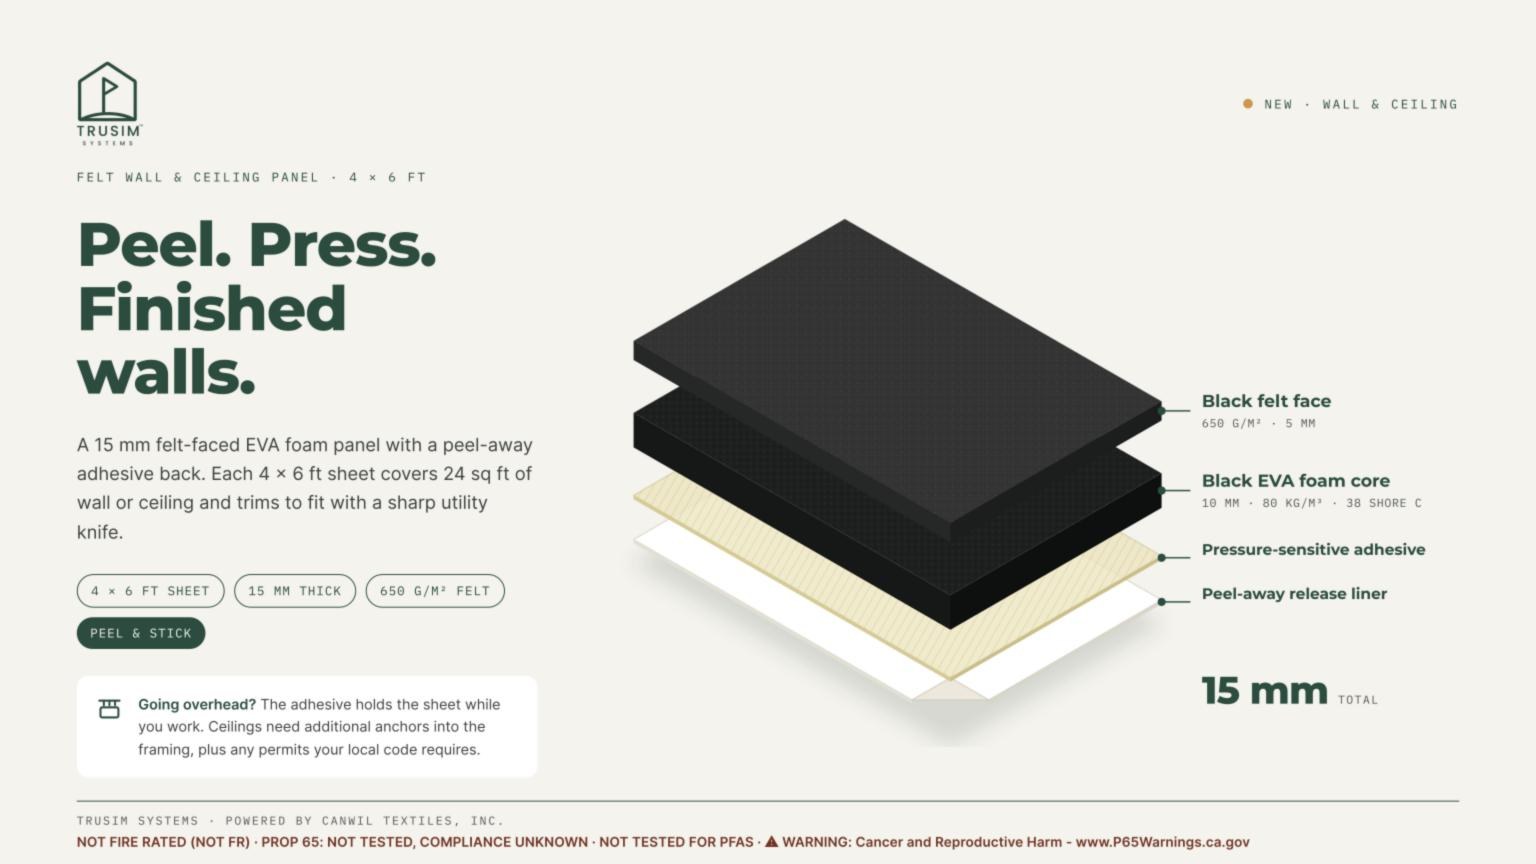
Felt Wall & Ceiling Panels bond a 650 GSM felt face to a 10 mm EVA foam core, with a peel-away adhesive back. Each 4 × 6 ft sheet covers 24 sq ft, trims with a utility knife, and goes up without sewing, framing or hook tape.
Why this product exists
Finishing the walls and ceiling around a simulator bay usually means hanging drapes, building panel frames or stapling felt to furring strips. Each one takes time and tools most homeowners don’t have. These panels do it in one step: peel the liner, press the sheet in place, trim the edges.
Specifications
| Specification | Details |
|---|---|
| Size | 4 × 6 ft (1219 × 1829 mm) |
| Coverage | 24 sq ft per sheet |
| Thickness | 15 mm total |
| Face | Black felt, 650 g/m², 5 mm |
| Core | Black EVA foam, 10 mm, 80 kg/m³ |
| Hardness | 38 Shore C |
| Back | Pressure-sensitive adhesive strips, peel-away liners |
| Color | Black |
Important:
- Not fire rated
- Prop 65 not tested, compliance unknown
- Not tested for PFAS
- Ceilings need additional anchors and any required permits. See the full notices below.
Primary applications
- Side walls and ceilings around golf simulator bays
- Home theaters and media rooms
- Offices, studios and game rooms
- Covering drywall, plywood or painted block around an enclosure
Want the same felt by the roll instead? See Polyester Felt.
Acoustic and light control benefits
The dense felt face and foam core absorb reflected sound, cut echo and soften ball-strike noise. The black felt face soaks up stray projector light, so the room stays dim around the screen and the image looks sharper.
Installation – walls
- Make sure the surface is clean, dry and dust-free.
- Peel the liner off the top adhesive strip, line the sheet up and press it into place.
- Remove the remaining liners one strip at a time, pressing the face flat as you go, working top to bottom.
- Trim edges and outlet openings with a sharp utility knife and a straightedge.
Installation – ceilings
The adhesive holds the sheet up while you work, but don’t count on adhesive alone overhead. Fasten every ceiling sheet into the framing.
- Mark the ceiling joists before you start.
- Peel and press the sheet into place the same way as on a wall.
- Drive 18-gauge brad nails, about 2 in long, through the sheet into the joists. Space them every 12 in along each joist and 2 in in from the edges.
- Brads into drywall alone won’t hold. Every brad must reach a joist or furring strip.
Who this product is for
- Golf simulator installers
- Commercial golf facilities
- Training centers
- Residential simulator builders
- Integrators seeking professional safety solutions
Fire, Prop 65, PFAS and ceiling notices
Not fire rated (not FR). This product has not been tested or certified to any fire retardant or flame-spread standard. TruSim Systems makes no fire performance, sprinkler or code compliance claims. Confirm material approval with your local Authority Having Jurisdiction before installation.
Prop 65: not tested, compliance unknown. This product has not been tested for chemicals listed under California Proposition 65. ⚠ WARNING: Cancer and Reproductive Harm – www.P65Warnings.ca.gov
PFAS: not tested. Unless otherwise specified, this product has not been tested for PFAS (per- and polyfluoroalkyl substances).
Ceiling installations. The buyer and installer are solely responsible for all permits, inspections and approvals required for ceiling work. Adhesive alone is not sufficient overhead: add mechanical anchors into the framing as shown above. TruSim Systems supplies material only and does not install.
Frequently asked questions
Do I need anything besides the adhesive?
On walls, no. On ceilings, yes: fasten every sheet into the joists with brad nails as shown above.
What surfaces does it stick to?
Clean, dry, smooth surfaces such as painted drywall or sealed wood. Paint must be fully cured. On textured, dusty or porous surfaces like raw block, test a small piece first.
Can I cut it to fit?
Yes. A sharp utility knife and a straightedge cut it cleanly. Cut from the felt side.
Can I use it in a garage?
Only if the space is heated and cooled. The adhesive is made for room-temperature use, and summer heat in an unconditioned garage or attic can soften it.
Will it stop a golf ball?
It softens the wall, but it is a finish, not a containment layer. Use it with a TruSim impact screen, backer and enclosure, not instead of them.
Can I take it down later?
Plan on it staying put. Pulling a sheet off can lift paint or the paper face of drywall.
Why TruSim Systems
- Engineered by textile professionals
- Custom-built, not mass produced
- Backed by Canwil Textiles’ supply chain and expertise
- Designed for installers, not hobbyists
Need a drawing or data sheet? Send your size code or room dimensions to [email protected] or call 678-985-5434.
This product has not been tested for PFAS unless stated otherwise above.